Friday, July 15, 2011

Let's Go Shopping!

I made this simple card for a friend of my mom's as a thank you. She generously gave me 3 huge bags filled with clothes she had out grown and some things still had the tags on them!

I love how she is simply just a silhouette, but still says so much. I added stickles to the shopping bags for added effect.

Monday, July 11, 2011

Lemon Card


This is one of the first cards I made on my Silhouette. This card turned out to be much harder than I thought it would be, because I didn't quite understand how my Silhouette worked yet. As you can see the lemon slice is much bigger than the lemon itself. lol I think it still turned out cute, but definitely shows that I was still learning.


I smugged the ends of the lemon with black ink to give it some character and then added crystal stickles to highlight the spots on the lemon and the middle of the slice. The pattern paper is from The Sweet Stack by DCWV and ribbon is my dollar find at Target.

Sunday, July 10, 2011

Modge Podge Letters

I am in the middle of transforming my son's room from the girls nursery into a little cowboys room. I will show you the finished result later, but for now I wanted to show you how I made letters for his room.


I started off with some unfinished letters from Joann's, scrapbook paper, paint and modge podge.


I painted the edges of each letter. No need to paint the entire letter, as the front will be covered with paper. My 6 year old took this picture, so it turned out a bit dark. lol


Then I traced the letters on to scrapbook paper. Be sure to remember to turn paper and letter both face down. The paper is so you don't have pencil marks showing and the letter should be face down or else you will end up with a backwards cut out.
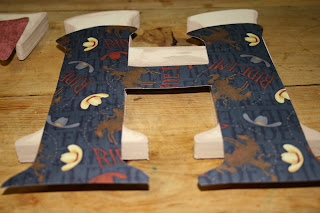
Then spread a thin layer of modge podge all over the front of the letter and place paper cut out on top. Wait a few minutes for it to almost dry and then cover the paper with another thin layer of modge podge. FYI: A little goes a long way! Do not put too much modge podge on or you will have a wet, bubbled and wrinkled result.

The wood letters do not come with the hardware to hang them, so just pick up some at your local hardware store and attach.


The end result! The S is stripes, E is Stars, T is paisley and the H has cowboy hats, cowboys on horseback and the words Ride Em!


Wednesday, July 6, 2011

Berry Sweet Birthday Invitation

For my daughter's 6th birthday, she had a Strawberry Shortcake birthday party. This is the invitation I made. I embossed the yellow background with various Birthday phrases and the Strawberry with Swiss Dots using the Cuttlebug. The stamp was from mypinkstamper.com

Monday, July 4, 2011

Happy 4th of July!

We attended a family pool party and I was responsible for the plates, plastic ware and chips & salsa. I wanted to add some American flair to what I brought, so this is what I came up with.

Buy American flag print plates, red, white, blue bowls found in the dollar section at Target, Stars & Stripes buckets also found at Target's dollar section and red, white, blue plastic ware. Then I bought blue with white stars scrapbook paper and cut them into strips. Next, I found another sheet of scrapbook paper that had circles with the American flag inside in shapes of hearts, stars and the liberty bell. I cut them out using a 1 1/2 inch hole punch and attached them to the strip of paper using glue dots, which I then wrapped around each set of plastic ware/napkins and stuck them in the buckets. The tortilla chips were blue and yellow and of course the salsa was red!