We recently acquired three large boxes of Washington Red apples. Now these apples are not the crispest of all apples, but I was not about to let them go to waste. Over the next few days I will post about 5 different ways I used up these apples. Today, we will focus on chunky applesauce.
I gathered my helpers and we got busy peeling, coring and dicing the apples. Nothing went to waste, as we gave all the peels and cores to our horses and soon when I get my compost pile going, half of our fruit/veggie scraps will go to the horses and the other half will be tossed into the compost. Great way to go green!
I put the apples (about 40) into a large stock pot with 1/2 cup of water,
took 1 cup of sugar, 1/4 cup of cinnamon and a tablespoon of nutmeg
and dumped them on top of the apples.
Combine everything and cook until the apples are soft.
Then take a potato masher and mash the apples until you reach the consistency you like.
Put them into your sterilized jars and process them. The end result is some very delicious chunky applesauce that can be eaten straight out of the jar, warmed up and served with vanilla ice cream or even used in an apple crisp.
Monday, July 23, 2012
Monday, July 9, 2012
Sidewalk Paint
Kids were bored and I was busy doing housework, so I had not time to entertain or take them any where. What to do? Remember several posts on pinterest on making your own sidewalk paint!
I grabbed some cornstarch & food coloring out of my pantry and went to work.
Poured a couple of tablespoons of cornstarch into a few holes in my muffin pan and added some squirt of food coloring. I only had the gel kind on hand, but obviously the liquid would work too (better in my opinion).
Than add a bit of water and stir. The teal is completely stirred up and the yellow is a work in progress.
I made 6 different colors, which resulted in
my kids having over an hour of fun! And of course, you realize this means mommy also had an hour of peace & quiet. Ahhhhh!
It works just as well on paper, as it does
on the sidewalk.
The best part is it can all be cleaned up by the spray of a hose, which I will have the kids to do, allowing them to cool off in the hot summer sun and add another 30 minutes or so of peace for me. Win, Win!
I grabbed some cornstarch & food coloring out of my pantry and went to work.
Poured a couple of tablespoons of cornstarch into a few holes in my muffin pan and added some squirt of food coloring. I only had the gel kind on hand, but obviously the liquid would work too (better in my opinion).
Than add a bit of water and stir. The teal is completely stirred up and the yellow is a work in progress.
I made 6 different colors, which resulted in
my kids having over an hour of fun! And of course, you realize this means mommy also had an hour of peace & quiet. Ahhhhh!
It works just as well on paper, as it does
on the sidewalk.
The best part is it can all be cleaned up by the spray of a hose, which I will have the kids to do, allowing them to cool off in the hot summer sun and add another 30 minutes or so of peace for me. Win, Win!
Wednesday, June 27, 2012
Three Wedding Cards
I have three wedding to attend between now and November. The first wedding is this Saturday, so I decided to go ahead and make all the cards. As you can see, the cards are all have the same die cut couple, but different paper.
This wedding is going to be done in black, pink and gold. So I made the card with a black card base, a gold layer, followed by a pink print layer and finished it off with a shear gold ribbon.
The inside has the same gold paper, layered with white cardstock and stamped with two sentiments.
The next wedding's colors are red, black and white. This card has a black card base, followed by a white layer and then on top of that is a red card stock that I embossed with swirls. The "Thinking of...." sentiment is on front this time and I had no ribbon to match, so I did it without.
Inside of the red, black & white card, as well as the next card, I just put in white card stock and the sentiment saying "On Your Wedding Day".
This last card is actually for the wedding I am attending this Saturday and her colors are purple with a touch of green. The card base is green, followed by a print that has purple, green, brown and a touch of blue and I added a purple ribbon to the bottom.
I really like how similar, yet different these cards are all due to the change of colors, making them very personal for each couple.
This wedding is going to be done in black, pink and gold. So I made the card with a black card base, a gold layer, followed by a pink print layer and finished it off with a shear gold ribbon.
The inside has the same gold paper, layered with white cardstock and stamped with two sentiments.
The next wedding's colors are red, black and white. This card has a black card base, followed by a white layer and then on top of that is a red card stock that I embossed with swirls. The "Thinking of...." sentiment is on front this time and I had no ribbon to match, so I did it without.
Inside of the red, black & white card, as well as the next card, I just put in white card stock and the sentiment saying "On Your Wedding Day".
This last card is actually for the wedding I am attending this Saturday and her colors are purple with a touch of green. The card base is green, followed by a print that has purple, green, brown and a touch of blue and I added a purple ribbon to the bottom.
I really like how similar, yet different these cards are all due to the change of colors, making them very personal for each couple.
Sunday, June 17, 2012
Father's Day
I bought my husband tickets for our local baseball game. He will be picking up the tickets at will-call, but I wanted to have something for him to actually open on Fathers Day. So I made the following extra large ticket!
I started out by cutting out this baseball wording on my Silhouette. If you have a Silhouette, you will notice the letters are all individually cut, which I didn't want, so all you have to do is weld them together.
This tickets is cut out at 9 x 4 inches
Layer the player and wording on top and then write out what you want it to say. Mine says the teams, date, time, section, row and seat numbers.
For the men of our church, we will playing a question game. The winning fathers will receive a cookie. I wanted the cookie to feel special, so I cut out the same ticket as above, but these are cut out at much smaller. I think they are like 2 1/5 x 1 1/2.
Stamp it with a sentiment
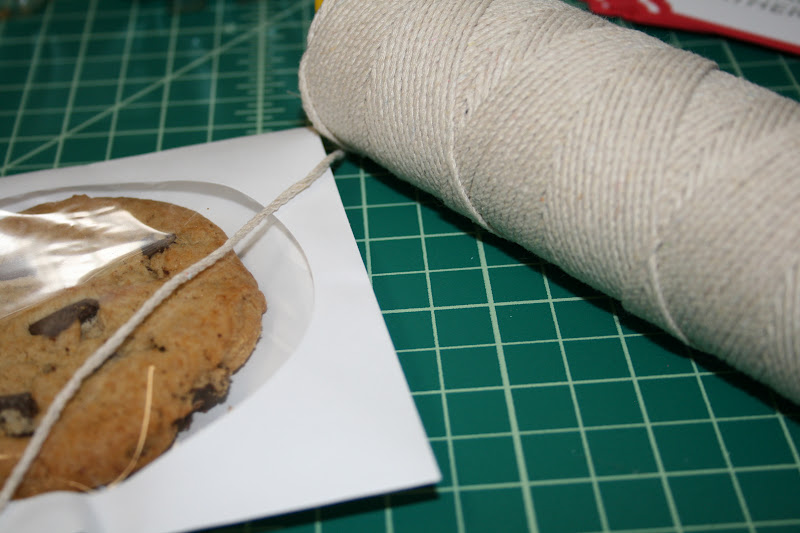
Put the cookie in a cd sleeve. The cookies are from Costco and the sleeves were bought at Wal-Mart
Wrap it in some twine. This is not craft twine, but what I actually use in my garden.
and tie if off.
Then just attach the ticket with glue dots!
Simple, yummy and masculine.
I started out by cutting out this baseball wording on my Silhouette. If you have a Silhouette, you will notice the letters are all individually cut, which I didn't want, so all you have to do is weld them together.
This tickets is cut out at 9 x 4 inches
Layer the player and wording on top and then write out what you want it to say. Mine says the teams, date, time, section, row and seat numbers.
For the men of our church, we will playing a question game. The winning fathers will receive a cookie. I wanted the cookie to feel special, so I cut out the same ticket as above, but these are cut out at much smaller. I think they are like 2 1/5 x 1 1/2.
Stamp it with a sentiment
Put the cookie in a cd sleeve. The cookies are from Costco and the sleeves were bought at Wal-Mart
Wrap it in some twine. This is not craft twine, but what I actually use in my garden.
and tie if off.
Then just attach the ticket with glue dots!
Simple, yummy and masculine.
Wednesday, June 13, 2012
Graduation Card and Gift
I really like how this graduation card turned out. My friends daughter graduated high school yesterday and her school colors are brown and gold, but I didn't know this and used black and gold. The base is a black 5.5 x 4.25 cardstock. Next layer is 5.25 x 4 yellow cardstock, followed by 5 x 3.75 black cardstock and lastly a 4.75 x 3.5 white cardstock embossed with bubbles and dots. The graduation cap is cut out at 3 1/2 and popped up with pop dots.
I lined the inside with yellow and white cardstock and stamped Happy Graduation.
For the gift I took a small plastic paint can (found at Michel's) and filled it with rolls of money and butter mints wrapped in $1,000,000 paper. Hence the statement I wrote in the card All of your hard work has "paid" off!
I lined the inside with yellow and white cardstock and stamped Happy Graduation.
For the gift I took a small plastic paint can (found at Michel's) and filled it with rolls of money and butter mints wrapped in $1,000,000 paper. Hence the statement I wrote in the card All of your hard work has "paid" off!
Friday, June 8, 2012
Bread & Butter Pickles
Vlasic Bread & Butter Pickles have always been my favorite.....until today. That is right folks, I found a new favorite Bread & Butter Pickle and it came directly from my own kitchen!
I took 5 cucumbers (yes, I know there are only 3 in this picture lol)
and sliced them up. (Note: I am forgot to take pictures of the next few steps) Then I sprinkled them with Pickling Salt, covered them with ice and put it into my fridge for 4 hours. Rinse them in cool water and add a cup of thinly sliced onions. Toss.
Next, I took all my dry ingredients and put them into a pot
and covered them with the liquid. Brought this mixture up to a boil stirring until the sugar dissolves.
Add the cucumbers and onion, return to just a boil and then turn off the fire.
Fill your sterilized jars with the cucumber & onions, then pour the brine in and give them a water bath for 10 minutes.
Let the pickles sit for 24 hours and then dig in! You will thank me when your done....I promise.
Ingredients:
1 1/2 - 2 pounds of cucumbers (any kind. I used Asian Cucumbers)
1 1/2 T salt
1 cup thinly sliced sweet onion
1 cup sugar
1 cup vinegar
1/2 cup apple cider vinegar
1/4 cup brown sugar
1 1/2 t. mustard seed
1/2 t. celery seed
1/8 t. turmeric
I took 5 cucumbers (yes, I know there are only 3 in this picture lol)
and sliced them up. (Note: I am forgot to take pictures of the next few steps) Then I sprinkled them with Pickling Salt, covered them with ice and put it into my fridge for 4 hours. Rinse them in cool water and add a cup of thinly sliced onions. Toss.
Next, I took all my dry ingredients and put them into a pot
and covered them with the liquid. Brought this mixture up to a boil stirring until the sugar dissolves.
Add the cucumbers and onion, return to just a boil and then turn off the fire.
Fill your sterilized jars with the cucumber & onions, then pour the brine in and give them a water bath for 10 minutes.
Let the pickles sit for 24 hours and then dig in! You will thank me when your done....I promise.
Ingredients:
1 1/2 - 2 pounds of cucumbers (any kind. I used Asian Cucumbers)
1 1/2 T salt
1 cup thinly sliced sweet onion
1 cup sugar
1 cup vinegar
1/2 cup apple cider vinegar
1/4 cup brown sugar
1 1/2 t. mustard seed
1/2 t. celery seed
1/8 t. turmeric
Wednesday, June 6, 2012
Cherries, Cherries and more Cherries!
I took my kids cherry picking earlier this week and we came home with 17 pounds of cherries. What does one do with that much? Well, you eat them in their natural state of yumminess, makes cherry pie and can them to use in future baking or to just open and eat the taste of summer when it is winter.
My husbands cousin let me borrow this cool cherry pitter. I was able to pit all the cherries in less than an hour.
Here are the freshly pitted cherries. Lookin' good!
I decided to make a fresh cherry pie last night. I started by taking 5 cups of cherries and tossing them in 1 1/4 cup of sugar and letting them sit for 20 minutes.
Then I added 1/3 cup flour, put them into a pre-made pie crust and put small pats of butter on top.
Put the top pie crust on and popped it into the oven at 425 degrees for 40 minutes.
The crust started to get too dark, so I placed sheet of foil on top and let it continue to cook.
Here is the finished pie. I can't wait to taste it tonight after dinner.
Then this morning, I washed all my jars and canning tools in warm soapy water and then put them into this tall pot to sterilize everything. I did't take a picture of the sugar water, but it was just 4 cups of water & 1 1/2 cups of sugar to every 2 pounds of cherries. Put the cherries into the jars and add the sugar water.
Here they are getting their water bath.
14 pint size jars of yummy goodness. I just loved hearing the ping of the tops sealing and can't wait to taste a bit of summer this winter.
My husbands cousin let me borrow this cool cherry pitter. I was able to pit all the cherries in less than an hour.
Here are the freshly pitted cherries. Lookin' good!
I decided to make a fresh cherry pie last night. I started by taking 5 cups of cherries and tossing them in 1 1/4 cup of sugar and letting them sit for 20 minutes.
Then I added 1/3 cup flour, put them into a pre-made pie crust and put small pats of butter on top.
Put the top pie crust on and popped it into the oven at 425 degrees for 40 minutes.
The crust started to get too dark, so I placed sheet of foil on top and let it continue to cook.
Here is the finished pie. I can't wait to taste it tonight after dinner.
Then this morning, I washed all my jars and canning tools in warm soapy water and then put them into this tall pot to sterilize everything. I did't take a picture of the sugar water, but it was just 4 cups of water & 1 1/2 cups of sugar to every 2 pounds of cherries. Put the cherries into the jars and add the sugar water.
Here they are getting their water bath.
14 pint size jars of yummy goodness. I just loved hearing the ping of the tops sealing and can't wait to taste a bit of summer this winter.
Subscribe to:
Posts (Atom)