Wednesday, June 29, 2011

Window Cleaner


Yesterday I spent the morning washing all my outside windows using a squeegee, bucket and the following ingredients: 1/2 C. Vinegar, 2 T. Corn Starch , 1/2 C. Ammonia and one gallon warm water. My windows came out clean and it was much cheaper than using a store bought cleaner.


You may be wondering why corn starch? Well, it is the key ingredient to making your windows sparkle! Now, I just read you should never mix Vinegar and Ammonia together because they cancel each other out. I don't know if that is true, because my windows came out really clean, but next time I will try using one or the other and see how I like the end result. Also, you will not want to add corn starch to anything you might want to store, like a spray bottle, as it will start to smell.


Awww Nuts!

The adorable little squirrels would be great for anything Fallish or for your favorite guy. Is that even a word? lol I used one as a thank you card for my in-laws hosting Thanksgiving dinner last year. Also, after I took these pictures, I added a stamp from My Pink Stampers stamp collection that said "Awww Nuts!" It was the perfect touch.


Monday, June 27, 2011

Valentine Goody Bag's

Instead of passing out store bought valentines day cards, I made these goody bags. For my friends, I put Hershey kisses in the bags. But my daughters school does not allow sugar or any food from the outside to be brought into class. So in her goody bags, we filled them with watches and whistles.


Friday, June 24, 2011

Homemade Laundry Soap

I never thought I would be the type to make my own laundry soap. First, I thought it would be way to hard and second, I thought the only people that did that kind of thing were a bit eccentric and maybe a bit hippy. But then slowly I started hearing of people who were doing it, one being my cousins wife, who is far from hippy. So I started to do some research and found that all reports were that it saved a ton of money, it was easy to make and that it really did get the clothes clean. Yes, the last was my main concern. I wanted to make sure the smells and dirt came off of the clothes. So I decided to make some and was very impressed. I just finished making my second batch and took pictures this time to post on here. To find the step by step instructions that I used, go to http://thefamilyhomestead.com/laundrysoap/. The three ingredients are: Arm & Hammer Washing Soap, Borax and Fels-Naptha Soap.

Here it is right after I mixed everything together and poured it into my bucket. It is very watery with bits of the soap that didn't quite melt. You can just strain them out.

After it sits for 24 hours it turn into a large block of gel, but breaks up as soon as you put your hand or spoon into it. The end result is this slimy looking stuff.


I store my laundry detergent in this old 5 gallon bucket that previously held Kirkland brand powder detergent. Because my kids and husband tend to get their clothes extra dirty, I add one scoop of Oxy Clean to 1/2 cup of my homemade detergent and then wash as normal. I hope you all find that making your own soap is super easy and will share your stories with me here in the comment section.


FYI: I have found all 3 ingredients at Winco. My Stator Bros did not have the Arm & Hammer Washing Soap, but did have the Fels-Naptha and Borax. I found the Washing Soap at Albertson.


A couple cards for boys/men

Cute, homemade greeting cards are not just for women, but also can be for men/boys. Here are two examples that I have made. I have a few more to share with you, but I still need to download those pictures.

This truck card is one I gave to my husband for valentines day. I cut out several hearts and layered them in the back of the truck. To give distinction between the hearts, I put a stitching around the edges and then stamped a few with affectionate words.

This sports car card I gave to a sweet little 3 year old for his Car's birthday, but it can obviously be given to a man as well. I used black ribbon to make it look like it is driving down the street.

Friday, June 17, 2011

Thanksgiving 2010

This past Thanksgiving, I was asked to put together my church's annual Thanksgiving dinner. I only had 8 days to get everything together and was on a very tight budget. Also, even though we had over 150 people attending, I still wanted it to feel special and like a family gathering. We had 7 rows of tables set up and each row had their own plates of food. Turkey, stuffing, yams, salad, rolls, mashed potato's, etc.

To keep the cost and work down to a bare minimum, I layed brown paper down instead of table cloths. This allowed me to draw place mats for each person for a fun special touch. The plates and cups are from Von's and I thought the orange/tan color was perfect. The napkins are from the Dollar Store and they were green and cream. I loved the fall colors!


Because there would be so many kids and we all know how restless kids can get, I made Pilgrim Hats out of black paper cups and construction paper. These held the crayons and the brown paper served as their drawing board, as well as a table covering. These turned out to be a huge hit!


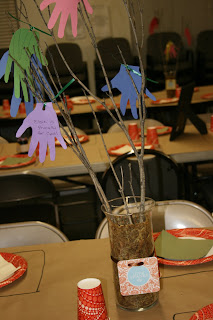
For the centerpieces, I cut some branches off of trees, put moss in glass vases and had the children of our church trace/cut out their hands and then write on them what they were thankful for. Another way to incorporate children into your festivities!


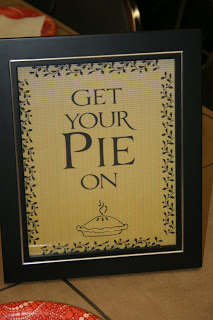
Additional touches to the table were these print outs I found online. There were two per row.


Now I only have 5 more months to decide what to do for this year!

Welcome!!!

Welcome to my new blog! I have really taken to making cards with the Silhouette I received for my birthday last year and am hoping to start selling them by Christmas 2011. I have also made my very first raised garden bed, which turned out to be a big fail, and make my own laundry detergent. I hope to start making other things from scratch soon too!

To keep my family blog separate from my craftin' and stuff, I decided to create this here blog to showcase the things I have made. I will post the good and the bad, so that we can all learn and be inspired. For now, I will leave you with the very first card I ever made. Hopefully you will see how I have improved as I post more cards down the road.


When my youngest daughter turned three years old, she had a Fairy party. I made a few of these butterflies to put on various things and decided to make this card with one of them. I printed out the cute saying on lime green paper, used scalloped scissors to cut the bottom and stuck it on a hot pink cardstock paper. Then I used ribbon I found in the dollar section at Target and stickles to leave the butterfly's trail.