
Friday, July 29, 2011
Hogs & Kisses
Just a fun little card I made for my mom. The blue paper on top(resembling the sky) is from my Sweet Treat paper pack and it has a sparkly diamond shape, the bottom (for mud) is chocolate brown and the pig was done in three layers. The first layer is black and you can see the eyes, plus it gives the pig more support/thickness. Then the hot pink, topped with the light pink. I finished it off with My Pink Stampers stamp Hogs & Kisses. I also smugged a little black ink with my fingers on the pig to resemble dirt.

Thursday, July 28, 2011
Signs
I made a couple of signs for my son's rodeo party and due to my being in a hurry, I learned a valuable tip that I thought I would share with you.
Normally, I would cut out my letters on my Silhouette and then I would adhere them to my card stock, trying my best to keep them equally spaced and straight. Well, because I was in a huge hurry, I decided to throw away the letters and just place the paper they were cut out of on top of a solid sheet of paper. Here I have the black paper on top of the cream paper.

Then I took the small pieces from the letters A, R and O and adhered them on where they should be. As you can see, this only took a minute to do and the letters are equally spaced and straight. I now know I will be doing all my signs this way!
 I did the same thing for my Cowboy Cafe sign, just in opposite colors. Here, I cut the letters out of the cream colored paper and adhered it to the black paper. (please excuse the blue painters tape, I ran out of masking tape and had no time to run to the store before the party. Ooops!)
Wednesday, July 27, 2011
Cowboy Table Centerpieces
If you read my post yesterday, than you have seen some of these die cuts before. Before I put them into picture frames and hung them on my son's wall, they were used as decorations for his party. Such a simple way to decorate and better yet, I can re-use the hay bales for October/November months!
Here is how I made them. I bought straw hay bales at Michael's, wrapped red/white gingham ribbon around them and fastened the ribbon with quilting needles. Then I cut up bunches of silk flowers and stuck them in the hay bale. The die cuts were made on my Silhouette machine and I taped it to a kabob stick and stuck it in the middle. Easy peasy!
Cowboy with lasso on horseback. (The bag behind it was filled with tortilla chips)
 A close up of the boot. I used silver stickles on the spur to make it shine.

A cowboy on a bucking bull was on the food table.

Cowboy on a bronc horse with the wording 8 second ride.

The calf roping required two kabob sticks due to it being wide.

A close up shot if the details.

I can't wait until Fall to transform these hay bales into decorations for my porch! I love that I was able to use the die cuts as party decorations, as well as, wall decor for my son's room and the hay bales can be used again for decor during the Halloween/Thanksgiving season year after year.
Here is how I made them. I bought straw hay bales at Michael's, wrapped red/white gingham ribbon around them and fastened the ribbon with quilting needles. Then I cut up bunches of silk flowers and stuck them in the hay bale. The die cuts were made on my Silhouette machine and I taped it to a kabob stick and stuck it in the middle. Easy peasy!
Cowboy with lasso on horseback. (The bag behind it was filled with tortilla chips)
 A close up of the boot. I used silver stickles on the spur to make it shine.
A cowboy on a bucking bull was on the food table.

Cowboy on a bronc horse with the wording 8 second ride.

The calf roping required two kabob sticks due to it being wide.

A close up shot if the details.

I can't wait until Fall to transform these hay bales into decorations for my porch! I love that I was able to use the die cuts as party decorations, as well as, wall decor for my son's room and the hay bales can be used again for decor during the Halloween/Thanksgiving season year after year.
Tuesday, July 26, 2011
Cowboy Wall Decor
One of the things I did for Seth's bedroom remodel was make a collage of pictures for a wall. I started out with four black frames and some scrapbook paper left over from the letters I had modge podged.

Then I cut the paper down to size and put them in the frames to hang on the wall. I left them empty because I had made some cowboy themed die cuts, to put in the frames, but first I was going to use them for his birthday party decor. (you will see how I did this in another post!)

Yesterday, I finally added the die cuts to the frames and here is the finished product!

A side shot picture, without the glare. Just in case you can't see what each picture is: top left - cowboy on bucking bull, top right - cowboy on a bronc horse with the words 8 second ride, bottom left - cowboy boot and bottom right - cowboy on horse with a lasso. I am very pleased with how they turned out!

Monday, July 25, 2011
Happy Bee-lated Birthday
I love this little bee! You can't tell in this picture, but the paper for the bee is charcoal colored with a grain pattern on it, making the bee a bit more realistic. This time I used white paper for the wings, but I will try vellum next time. I used a white pen to add the smile.


Friday, July 22, 2011
Sweet Baby Girl
This is a very simple and quick card I had to make one morning before running out the door to a baby shower. The mother to be was expecting a sweet baby girl, so I opted to make a pink onesie. The card is green, with white/pink diamond shaped pattern paper on top. The die cut is two layered. The bottom layer is solid white and the top is pink. I used crystal stickles in the heart and tied a pink ribbon on the bottom with a stamp that says 'Sweet'.


Monday, July 18, 2011
Sneak Peak...
Here is a sneak peak into a couple of projects I will be showing you in the next couple of days. My son had a rodeo party this past weekend and I was able to make most of the decor.


Friday, July 15, 2011
Let's Go Shopping!
 I made this simple card for a friend of my mom's as a thank you. She generously gave me 3 huge bags filled with clothes she had out grown and some things still had the tags on them!
I love how she is simply just a silhouette, but still says so much. I added stickles to the shopping bags for added effect.
Wednesday, July 13, 2011

Monday, July 11, 2011
Lemon Card

This is one of the first cards I made on my Silhouette. This card turned out to be much harder than I thought it would be, because I didn't quite understand how my Silhouette worked yet. As you can see the lemon slice is much bigger than the lemon itself. lol I think it still turned out cute, but definitely shows that I was still learning.
I smugged the ends of the lemon with black ink to give it some character and then added crystal stickles to highlight the spots on the lemon and the middle of the slice. The pattern paper is from The Sweet Stack by DCWV and ribbon is my dollar find at Target.
Sunday, July 10, 2011
Modge Podge Letters
I am in the middle of transforming my son's room from the girls nursery into a little cowboys room. I will show you the finished result later, but for now I wanted to show you how I made letters for his room.
I started off with some unfinished letters from Joann's, scrapbook paper, paint and modge podge.

I painted the edges of each letter. No need to paint the entire letter, as the front will be covered with paper. My 6 year old took this picture, so it turned out a bit dark. lol

Then I traced the letters on to scrapbook paper. Be sure to remember to turn paper and letter both face down. The paper is so you don't have pencil marks showing and the letter should be face down or else you will end up with a backwards cut out.
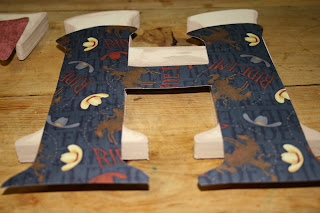 Then spread a thin layer of modge podge all over the front of the letter and place paper cut out on top. Wait a few minutes for it to almost dry and then cover the paper with another thin layer of modge podge. FYI: A little goes a long way! Do not put too much modge podge on or you will have a wet, bubbled and wrinkled result.
The wood letters do not come with the hardware to hang them, so just pick up some at your local hardware store and attach.
The end result! The S is stripes, E is Stars, T is paisley and the H has cowboy hats, cowboys on horseback and the words Ride Em!

Friday, July 8, 2011


Wednesday, July 6, 2011
Berry Sweet Birthday Invitation
 For my daughter's 6th birthday, she had a Strawberry Shortcake birthday party. This is the invitation I made. I embossed the yellow background with various Birthday phrases and the Strawberry with Swiss Dots using the Cuttlebug. The stamp was from mypinkstamper.com
Monday, July 4, 2011
Happy 4th of July!
We attended a family pool party and I was responsible for the plates, plastic ware and chips & salsa. I wanted to add some American flair to what I brought, so this is what I came up with.
Buy American flag print plates, red, white, blue bowls found in the dollar section at Target, Stars & Stripes buckets also found at Target's dollar section and red, white, blue plastic ware. Then I bought blue with white stars scrapbook paper and cut them into strips. Next, I found another sheet of scrapbook paper that had circles with the American flag inside in shapes of hearts, stars and the liberty bell. I cut them out using a 1 1/2 inch hole punch and attached them to the strip of paper using glue dots, which I then wrapped around each set of plastic ware/napkins and stuck them in the buckets. The tortilla chips were blue and yellow and of course the salsa was red!

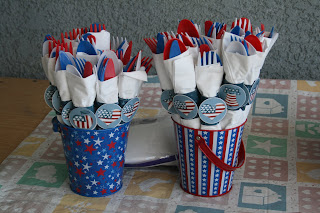
Buy American flag print plates, red, white, blue bowls found in the dollar section at Target, Stars & Stripes buckets also found at Target's dollar section and red, white, blue plastic ware. Then I bought blue with white stars scrapbook paper and cut them into strips. Next, I found another sheet of scrapbook paper that had circles with the American flag inside in shapes of hearts, stars and the liberty bell. I cut them out using a 1 1/2 inch hole punch and attached them to the strip of paper using glue dots, which I then wrapped around each set of plastic ware/napkins and stuck them in the buckets. The tortilla chips were blue and yellow and of course the salsa was red!


Friday, July 1, 2011
Summer Candy Bars
How fun would it be to receive these cute summer candy bars? They can be used as a end of year gift to a teacher, pool party favors, or as I used them...thank you's for my MOPS table leaders. You could wrap up any kind of candy bar, but I used the King size Hershey chocolate bars. I found the paper in the dollar section at Target and the stickers on clearance also at Target.

Here are a couple of close up shots.


Here are a couple of close up shots.


Subscribe to:
Posts (Atom)